12 Expert Tips for Flawless Spray Painting Results
Spray painting is a versatile and efficient way to transform various items in your home, from vintage mirrors to armchairs. By mastering the art of spray painting, you can save time and money while achieving professional-looking results. Follow these expert tips to ensure your spray painting projects are a success and learn how to troubleshoot common issues along the way.
1. Choose the Right Products
Before starting your project, research and purchase the appropriate spray paint and materials for the surface you'll be working on. Visit your local hardware store for expert advice on primers, sealants, and color options.
Ensuring you have the right products will lay the foundation for a flawless finish. Consider the type of surface you'll be painting, such as metal, wood, or plastic, and select a spray paint that is specifically designed for that material.
2. Work in a Well-Ventilated Area
Always spray paint in a well-ventilated area to avoid inhaling fumes, which can cause dizziness and nausea. If working indoors, open windows and use fans to promote air circulation. Wear a mask for added protection and to ensure your safety throughout the project.
If possible, work outdoors or in a garage with the door open to minimize the accumulation of fumes.
3. Prepare the Surface and Paint
Proper surface preparation is crucial for a smooth and long-lasting spray paint finish. Clean the surface thoroughly, removing dust, debris, and rust with a brush or sandpaper. If using water or cleaning solutions, allow the surface to dry completely before applying paint.
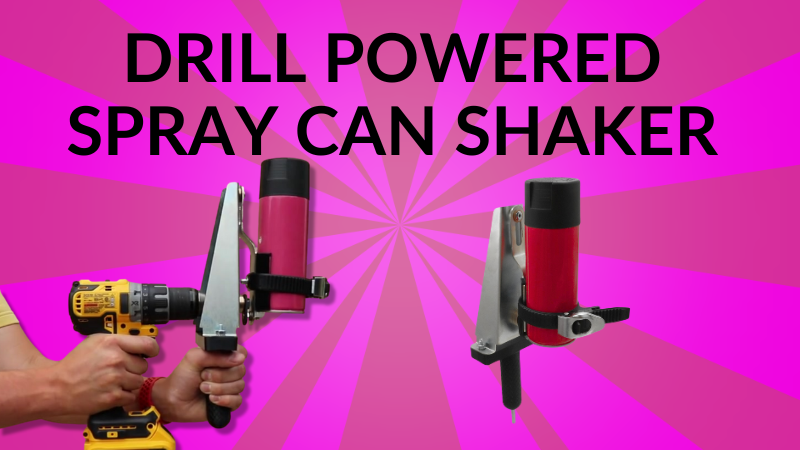
Make sure your paint is shaken completely and consider using a powered spray can shaker if you are not a fan of shaking paint of have many cans to shake.
For best results, use a degreaser or all-purpose cleaner to remove any oils or residue that may prevent the paint from adhering properly.
4. Protect Your Workspace
Shield your surroundings from overspray by using drop cloths, plastic covers, or cardboard. Cover doorknobs and remove light switches if necessary. In case of accidental overspray, learn how to remove spray paint from unintended surfaces for easy clean-up.
Don't forget to protect yourself by wearing gloves, safety glasses, and old clothing that you don't mind getting paint on.
5. Prime the Surface
Although not always required, using a primer is highly recommended for most spray painting projects. Primer promotes even coverage, reduces the need for extra coats, and enhances the final result. You can find more tips in our painting guide found here.
Ensure the primer is compatible with your chosen spray paint for optimal performance. Some spray paints have built-in primers, which can save you time and effort.
6. Test Your Spray Paint
Before applying paint to your project, always test the spray paint nozzle on a piece of cardboard or drop cloth. This allows you to check for any sputtering and practice your spraying technique, ensuring a smooth and consistent application. Adjust the nozzle if necessary and familiarize yourself with the spray pattern and coverage.
7. Perfect Your Technique
Maintain a distance of 6-8 inches between the spray paint can and the surface. Apply even pressure and use consistent speed with each stroke, slightly overlapping to avoid striping.
Shake the can periodically to ensure an even gloss throughout the project. Begin and end your strokes off the edge of the surface to prevent heavy spots or drips.
8. Apply Multiple Thin Coats
For the best results, apply three thin coats of spray paint rather than one heavy coat. Begin with horizontal strokes, followed by vertical strokes, allowing 10 minutes of drying time between each coat.
Complete all three coats within an hour and let the final product dry for 24-48 hours for a flawless finish. Applying thin coats helps prevent drips, runs, and uneven coverage.
9. Sand Between Coats (Optional)
For an ultra-smooth finish, consider lightly sanding the surface with fine-grit sandpaper between coats. This helps remove any dust, debris, or imperfections that may have settled on the surface during the drying process.
Be sure to wipe away any sanding dust before applying the next coat of paint.
10. Keep the Nozzle Clean
To ensure consistent performance and prevent clogging, clean the spray paint nozzle regularly. After each use, turn the can upside down and spray until only clear gas comes out.
Wipe the nozzle with a cloth dampened with paint thinner to remove any residue. A clean nozzle will provide a better spray pattern and help you achieve a more professional-looking finish.
11. Use a Clear Top Coat
To protect your newly painted surface and enhance its durability, consider applying a clear top coat once the final coat of paint has dried completely. A clear top coat can help prevent chipping, scratching, and fading, especially on high-traffic items like furniture.
Choose a top coat with a finish that complements your project, such as glossy, satin, or matte.
12. Troubleshoot Common Issues
Even with careful preparation and technique, you may encounter some common issues when spray painting. If you notice drips or runs, sand the affected area and reapply paint in thin coats. For uneven coverage, apply additional thin coats until you achieve a consistent finish.
If the paint is not adhering properly, ensure the surface is clean, dry, and properly primed. By addressing these issues promptly, you can still achieve excellent results.
By following these expert spray painting tips and taking the time to properly prepare your workspace and materials, you'll be well on your way to transforming your home with stunning, professional-quality results.
Embrace the power of spray paint and unleash your creativity in your next DIY project. With practice and patience, you'll soon become a spray painting pro, tackling increasingly ambitious projects with confidence and skill.

