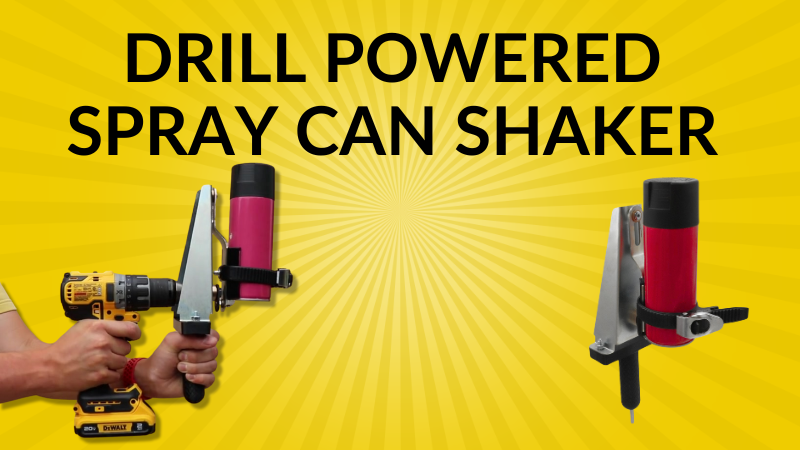
The Ultimate Guide to Spray Can Shakers
If you're a professional painter or DIY enthusiast, you know the importance of properly mixing your spray paint before use. Inconsistent color, clumping, and poor coverage can all result from inadequately mixed paint. That's where a spray can shaker comes in handy. In this ultimate guide, we'll cover everything you need to know about these essential tools.
What is a Spray Can Shaker?
A spray can shaker is a device designed to quickly and efficiently mix the contents of a spray paint can. It ensures that the pigments, solvents, and propellants are evenly distributed, resulting in a consistent color and smooth application.
How Do Spray Can Shakers Work?
Spray can shakers work by agitating the can at high speeds, typically through a shaking or rotating motion. This rapid movement helps to break up any settled pigments and ensures that all the ingredients are thoroughly combined.
Benefits of Using a Spray Can Shaker
There are several key benefits to using a spray can shaker:
-
Consistent color: By ensuring that the paint is properly mixed, you'll achieve a more uniform color throughout your project.
-
Better coverage: Well-mixed paint will provide better coverage, reducing the need for multiple coats and saving you time and money.
-
Reduced clumping: Shakers help break up any clumps that may have formed in the paint, resulting in a smoother application.
-
Time-saving: Manually shaking a can of spray paint can be time-consuming and tiring. A spray can shaker does the work for you, saving you valuable time and effort.
Types of Spray Can Shakers
There are three main types of spray can shakers available:
Manual Shakers
Manual shakers are hand-operated and typically require you to shake the can while it's held in place. These are the most affordable option but can be less efficient than electric or pneumatic models.
Electric Shakers
Electric spray can shakers use a motor to agitate the can at high speeds. They're more powerful than manual shakers and can mix paint more quickly and thoroughly. However, they do require access to an electrical outlet.
Pneumatic Shakers
Pneumatic shakers are powered by compressed air and are often used in professional settings. They offer the fastest and most efficient mixing but require an air compressor to operate.
How to Use a Spray Can Shaker Properly
Using a spray can shaker is relatively straightforward, but there are a few key steps to follow:
-
Ensure that the can is securely fastened in the shaker.
-
Set the timer or run the shaker for the recommended duration (usually 1-2 minutes).
-
Remove the can from the shaker and test the paint on a piece of scrap material to ensure it's properly mixed.
Maintenance and Cleaning Tips for Spray Can Shakers
To keep your spray can shaker in top condition, follow these maintenance and cleaning tips:
-
Wipe down the shaker after each use to remove any paint residue.
-
Lubricate moving parts regularly to prevent wear and tear.
-
Store the shaker in a dry, dust-free environment when not in use.
Troubleshooting Common Issues with Spray Can Shakers
If you encounter any problems with your spray can shaker, try these troubleshooting tips:
-
Check that the can is properly seated and secured in the shaker.
-
Ensure that the shaker is plugged in and receiving power (for electric models).
-
Verify that the air compressor is connected and providing adequate pressure (for pneumatic models).
-
Consult the manufacturer's manual or contact customer support for further assistance.
Frequently Asked Questions About Spray Can Shakers
Can I use a spray can shaker with any type of spray paint?
-
Yes, most spray can shakers are compatible with standard-sized spray paint cans.
How long should I shake a can of spray paint?
-
Generally, 1-2 minutes of shaking is sufficient, but refer to the paint manufacturer's instructions for specific guidance.
Are spray can shakers worth the investment?
-
If you frequently use spray paint, a shaker can save you time and effort while improving the quality of your results.
Conclusion
A spray can shaker is an invaluable tool for anyone who regularly works with spray paint. By ensuring that your paint is thoroughly mixed, you'll achieve better color consistency, coverage, and overall results. Whether you opt for a manual, electric, or pneumatic model, investing in a spray can shaker is a smart choice for any painter or DIY enthusiast.

